What are the 3 Stages of Dental Implants? The Ultimate Guide

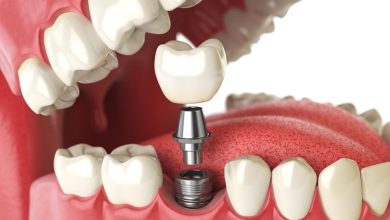
The three stages of dental implants are:
- The placement of the implant into the jawbone.
- Adding the abutment to connect the artificial tooth
- Placing the prosthetic tooth or crown onto the abutment
This comprehensive dental procedure involves multiple steps to ensure a secure and functional replacement for a missing tooth.
From the initial implant placement to the final restoration, each stage plays a crucial role in the success of the dental implant. Patients need to understand the process and know what to expect at each stage before dental implant treatment.

Credit: go.ddslab.com
Stage 1: Implant Placement
Introduction to the first stage of dental implants
The first stage of dental implants is known as implant placement. This crucial step sets the foundation for a successful implant procedure. During this stage, a dental professional will carefully place the implant into the jawbone, eventually serving as the anchor for the artificial tooth. The implant placement process involves various steps, starting with a consultation and evaluation to determine if you are a suitable candidate for dental implants. Selecting a skilled dental professional specializing in dental implant procedures is essential to ensuring a safe and successful outcome.
Process of implant placement
Implant placement involves several vital steps critical to the procedure’s success. Here’s an overview of the process:
- Consultation and evaluation: At this initial stage, the dental professional will assess your oral health, take X-rays, and discuss your expectations and goals. This step is crucial to determining if dental implants are the right option for you.
- Preparing the jawbone: In some cases, the jawbone may require preparation before implant placement. This could involve bone grafting or sinus augmentation to ensure enough bone density and volume to support the implant.
- Implant placement procedure: Once the jawbone is ready, the dental professional will carefully place the implant into the jawbone. This is typically performed under local anesthesia to ensure your comfort during the procedure. The implant is surgically inserted into the jawbone, and the gum tissue is stitched back in place.
- Healing and osseointegration: After implant placement, the healing process begins. The jawbone needs time to fuse with the implant in osseointegration. This is crucial, as it creates a strong and stable foundation for the artificial tooth.
The importance of a skilled dental professional
Choosing a qualified implant specialist is crucial for the success of the implant placement stage. Dental implant procedures require precision and expertise; even a minor error can compromise the outcome. A skilled dental professional will have the necessary training, experience, and attention to detail to ensure the implant is placed correctly and securely. They will also provide thorough post-operative care and guidance to minimize the risk of complications and promote optimal healing.
Benefits of a successful implant placement
A successful implant placement offers a range of benefits, including:
- Restored functionality: Dental implants function like natural teeth, allowing you to speak, chew, and bite comfortably.
- Enhanced aesthetics: Implants provide a natural-looking solution for missing teeth, improving your smile and facial appearance.
- Improved oral health: Dental implants preserve the jawbone’s and adjacent teeth’ integrity, preventing further oral health issues.
- Long-term durability: With proper care and maintenance, dental implants can last a lifetime, providing a durable and reliable tooth replacement option.
Potential risks and complications
While dental implant placement is generally safe and prosperous, some potential risks and complications should be considered. These include:
- Infection and inflammation: Like any surgical procedure, there is a risk of infection at the implant site. Additionally, inflammation can occur, delaying the healing process.
- Nerve damage: Rarely, the nerves in the jawbone may be damaged during implant placement, resulting in numbness or tingling sensation.
- Failed implant integration: Sometimes, the implant may need to integrate correctly with the jawbone, leading to failure. This can happen due to inadequate bone density or improper implant positioning.
It is essential to discuss these potential risks and complications with your dental professional and follow their post-operative instructions carefully to minimize the likelihood of complications and ensure a successful implant placement.
Stage 2: Abutment Placement
Introduction to the second stage of dental implants
In the process of getting dental implants, the second stage is abutment placement. The abutment is a crucial component that connects the implant to the prosthetic tooth or crown. This stage follows the initial placement of the implant into the jawbone. Understanding the purpose and function of the abutment and the procedure for its placement is essential for patients undergoing the dental implant process.
Purpose and function of the abutment
The abutment is an intermediary between the implant and the prosthetic tooth. It acts as a connector, allowing for the secure attachment of the crown to the implant. The abutment is meticulously chosen to ensure a proper fit, alignment, and optimal esthetics and functionality.
Timing of abutment placement
The timing of abutment placement varies depending on the individual case and the specific treatment plan. In some cases, the abutment may be placed at the same time as the implant, whereas in others, it may be placed weeks or months later. The healing process, bone integration, and the dentist’s professional judgment all play a role in the decision regarding when to place the abutment. The goal is to ensure that the implant site is fully healed and ready for the abutment before proceeding.
Procedure for abutment placement
Uncovering the implant is the first step in the abutment placement procedure. This involves removing healing caps or temporary crowns during the initial implant placement stage. Once the implant is exposed, impressions and measurements are taken to create a custom abutment. This involves using dental materials to model the patient’s mouth and implant area accurately.
Next, the custom abutment is attached to the implant using special dental tools and techniques. The abutment is precisely positioned and secured to ensure stability and a proper fit. The dentist may make any necessary adjustments to ensure optimal esthetics and functionality.
The importance of proper abutment selection
The abutment selection plays a crucial role in dental implants’ overall success and longevity. Proper abutment selection considers factors such as the implant type, location, and the patient’s esthetic requirements. Choosing an abutment that provides long-term stability, promotes healthy gum tissue, and allows for a natural-looking smile is essential.
Different types of abutments
Various abutments are available to accommodate different implants and patient needs. These include stock abutments, which are pre-formed and ready-made, as well as custom abutments, which are individually designed for each patient. Additionally, temporary abutments are used during the healing process, and final permanent abutments provide a long-term solution.
Considerations for a natural-looking smile
When selecting an abutment, the dentist considers the patient’s desired aesthetics. The abutment’s shape, size, and color are carefully chosen to blend seamlessly with the surrounding natural teeth. The goal is to create a natural-looking smile that enhances the patient’s overall appearance and boosts their confidence.
Adjustments and follow-up care
After the abutment placement, the dentist may make necessary adjustments to ensure a comfortable and functional fit. The patient will be provided with instructions for proper oral hygiene and care to maintain the implant’s and surrounding tissues’ health. Regular follow-up appointments are scheduled to monitor the progress and ensure the long-term success of the dental implant.
Stage 3: Crown Placement
Introduction to the third stage of dental implants
After the implant placement and the abutment attachment, we now enter the final stage of the dental implant journey – the crown placement. This is the exciting moment when your prosthetic tooth, also known as the crown, is fitted onto the abutment, completing your dental implant procedure. In this stage, our focus shifts to ensuring that the crown looks and functions like a natural tooth, providing you with a beautiful and confident smile. Let’s dive into the details of this stage and explore the various steps involved in the crown placement process.
Overview of the prosthetic tooth or crown
The prosthetic tooth, or crown, is the visible part of your dental implant that mimics the appearance and functionality of a natural tooth. It is custom-made to blend seamlessly with your existing teeth, ensuring a natural and aesthetically pleasing result. The crown is typically made from durable and biocompatible materials such as porcelain or zirconia, known for their strength and lifelike appearance. During the crown placement, several steps are taken to ensure a precise fit and optimal aesthetics.
Creating a custom crown
To create a custom crown that perfectly matches your unique dental structure, impressions and molds of your teeth and abutment are taken. These impressions are the blueprint for crafting your crown, ensuring a precise fit and optimal function. The impressions are sent to the dental laboratory, where skilled technicians use specialized techniques and materials to create a crown that matches the shape, size, and color of your natural teeth, creating a seamless result.
Impression and mold
During this step, a high-quality dental impression material captures the shape and contours of your abutment and surrounding teeth. This ensures that the crown will fit precisely onto the abutment, creating a seamless and comfortable result. The impression material is placed around the abutment, allowed to set, and then carefully removed to create an accurate mold.
Shade selection
A shade selection process is carried out to ensure that the crown matches the color and shade of your natural teeth. This involves comparing the shade of your natural teeth to a shade guide to determine the most appropriate color for your crown. Our experienced dental team will guide you through this process, ensuring the final crown blends harmoniously with your smile.
Fitting and placement of the crown
Once the custom crown has been created, it is time for the fitting and placement stage. The crown will be carefully tested to ensure it fits precisely onto the abutment, allowing for proper functionality and aesthetics. Any necessary adjustments can be made during this step to ensure a comfortable fit and a beautiful smile.
Bonding and alignment
A unique dental adhesive or cement, is used to securely attach the crown to the abutment. The dentist will apply this adhesive to the abutment and carefully position the crown onto it, ensuring proper alignment with the surrounding teeth. This step is crucial to guaranteeing the stability and longevity of your dental implant.
Final adjustments
After the crown has been bonded to the abutment, the dentist will make final adjustments to ensure the bite feels natural and comfortable. Any necessary modifications will be made to achieve optimal occlusion (how your teeth come together when you bite), ensuring that your dental implant functions like a natural tooth.
Care and maintenance of the crown
Proper care and maintenance are essential to ensuring the long-term success of your dental implant and crown. Here are some essential practices to keep in mind:
– Maintain good oral hygiene practices, including regular brushing, flossing, and rinsing with an antimicrobial mouthwash.
– Avoid biting or chewing on hard objects, such as ice or pens, to prevent damage to the crown.
– Make sure to attend regular dental check-ups to have your crown and implant assessed and professionally cleaned.
Long-term success and considerations
With proper care and maintenance, dental implants have the potential to last for many years, providing you with a functional and natural-looking smile. However, it’s essential to remember that dental implants’ lifespan can vary depending on factors such as overall oral health, lifestyle habits, and individual circumstances. Regular dental check-ups and good oral hygiene practices are vital for detecting any potential issues early on and ensuring the long-term success of your dental implant.
Lifespan of dental implants
The lifespan of dental implants can vary from person to person, but with proper care and maintenance, they can last for many years and even a lifetime in some cases. Factors such as oral hygiene practices, lifestyle habits, and overall oral health can influence the longevity of dental implants. Regular dental check-ups, routine cleanings, and an excellent oral hygiene routine will help maximize the lifespan of your dental implant.
Potential future treatments or replacements
While dental implants offer a long-term solution for missing teeth, it’s essential to be aware of potential future treatments or replacements that may be required. Over time, wear and tear and changes in oral health may necessitate adjustments or replacements for the crown or other components of the dental implant. Staying proactive in your oral health and keeping up with regular dental visits will ensure that any necessary treatments or replacements are addressed promptly, maintaining the integrity and success of your dental implant.
Frequently Asked Questions On What Are The 3 Stages Of Dental Implants
What Is Stage 2 Of A Dental Implant?
Stage 2 of a dental implant involves the placement of the abutment onto the implant. The abutment is where the artificial tooth will be connected. Finally, the prosthetic tooth, or crown, is placed onto the abutment.
How Long Do You Go Without Teeth When Getting Implants?
You usually go without teeth for three to six months when getting implants.
What Is The 3 2 Rule For Dental Implants?
The 3-2 rule for dental implants involves three stages: 1. Implant placement in the jawbone, 2. Adding an abutment to connect the artificial tooth, and 3. Placing the prosthetic tooth or crown onto the abutment.
What They Don’t Tell You About Dental Implants?
A common misconception about dental implants is that they replace all your teeth. However, most patients only need one or a few implants, and there’s no need to replace your healthy teeth. Dental implant procedures involve three stages:
- Placing the implant into the jawbone
- Adding the abutment for the artificial tooth
- Placing the crown onto the abutment
Conclusion
The dental implant procedure consists of three stages:
- The implant is placed into the jawbone.
- The abutment is attached to the implant for tooth connection.
- The prosthetic tooth or crown is placed on the abutment.
Understanding these stages is crucial for patients considering dental implants, giving them a clear timeline of the procedure and what to expect.
With advancements in dental technology, dental implants offer a permanent and aesthetically pleasing solution for patients with missing teeth.